
I just tiled a phone booth.
No shit.
Actually, I think it is smaller than your standard phone booth. Certainly smaller than the
Tardis.
This has got to be the world's smallest shower stall outside of a motor home. It measures barely 25 inches on a side inside. It is teeny. And the worst part?
I built it that way.
See, I've been working on a little cabin - one of those summer places you stay when you go on vacation. Nice little units. Nothing big, but with a smell of salt air and quiet surroundings. Just what you want on vacation in Maine. View of the cove and everything. OK. So the old shower was one of those free-standing units made of semi-rigid plastic frame and flexible vinyl walls. Icky. Well, the base was just so utterly stained as to be simply useless, so the owners decided to rip it out. Can't blame them a bit. Only the base was about 30 by 30 inches. No problem, says they, and they run up to the big orange box and come back with the smallest shower stall in the place. Only it's 32 inches on a side. Uh-oh. 32 inches means we're into the toilet tank on one side (the tank is already against the far wall) and an inch and a half into the glass of the bathroom window. Oh dear.
Well we stood around and scratched our heads for a while and decided that we'd have to fabricate something to fit the old footprint of the shower stall. Fine. I order some lumber and some plumbing parts and some
wonder board. I go to the hardware store and pick up lots of bits and pieces. I come back and get to work. The first thing I did was take out the toilet because it was simply in the way and there was no room to move. Here's what I started with:

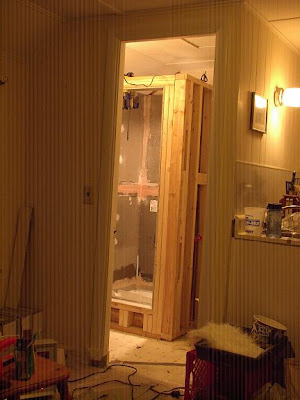
So here is what I did first. I framed in the square-
ish box that will become the shower stall and ran the appropriate plastic drain bits down through the existing hole.

I don't know if you can tell from this picture, but there are a TON of shims under the entrance edge (near the bottle of propane). In order to make this level, I had to build up fully 7/8 inch. And this was after jacking and supporting things underneath (see below). This was a crazy thing.

I topped it off with a piece of 3/4 inch plywood that almost lined up with the plumbing stuff.

I did get the pipes braced so that they lined up with the hole and everything there was good. Before I went any further, though, I thought it would be wise to reinforce that section of the building before I installed a couple hundred pounds of cement board and tile. Under I went.
Now these cottages, and there are thousands of them up and down the coast of Maine and around every lake and pond inland, are up on blocks. They do not have a regular foundation. Cement blocks and chunks of wood hold them up at the corners and in the middle, usually, and when the spring comes they need to be jacked and leveled. My young friend J and I did just that at this place earlier this year.
A very muddy, nasty job it was.Here is a picture out the bathroom window at the cottage next door. Note the lattice at the ground level. This covers up the blocks and posts that the cottage is perched upon and where I must go to deal with plumbing and supports. Yeah. cozy.

So under I went to put in some extra blocks and supports. While I was there I pulled the plug on the trap for the shower. If I'm going to be rinsing grout, it needs to have a place to go where it won't
freeze and break pipes. These cabins are not winterized and the water is turned off and the pipes drained before winter. This also means I need to carry warm water from the office/residence to clean tools, etc. Lots of fun. Oh well. Could be worse. The cabin has a heater and the power is on, so I can bring my radio and plug in my tools.
After I got the wood floor finished, I set myself up to play with some copper pipes. I do love copper. I love the feel of the metal, I love the shine of the polished surface, I love watching the flux boil out of a joint and the solder flowing in. Science is so damned cool. So I fiddled around underneath the cabin and ran the pipes up through the floor. I put in a couple of shut-off valves for good keeping, then ran the pipes up to the shower mixer gizmo (the thing with the knob that makes the water come out onto your person) which I had mounted to a cross-member. It got a little warm in there, and I charred the cross-member a bit, but nothing I couldn't put out. The joint should hold, though.


As sometimes happens when soldering pipes, there is a little support required to really snug the joints together. That's what the two-by-four is about here. Notice the shiny stuff on the top of the board and the same kind of shiny stuff on the thighs of my
Carharts. Let's just say I am very, very glad for the double thickness of denim. I felt the splashes when the molten solder hit my legs, but not the painful burns that would have happened in lesser pants.
So anyway, I get the thing boxed in and the pipes figured out. I make the floor out of wonder board:

I used my
Dremel to carve out the sloped sides of the drain hole to accommodate the floor drain for the shower.

Then I cut it into pieces so I can pitch the floor just the tiniest bit to better facilitate drainage.


The little board looking things? Cedar shingles. 3/8 inch thick at the thickest part and thin down to nothing. The pink looking stuff in the seams and screw holes? That would be
bondo. The shiny stuff in the drain hole? That would be duct tape. I have lived in Maine long enough to value the myriad of uses for each.
So then I got the wonder board up on all the walls. Nasty stuff. Have to use an abrasive wheel for masonry on my good circular saw. Dust gets everywhere. Blowing gray shit out of my nose for days afterward.
Bleah.
I had to line the bottom of the pan with a special vinyl membrane that had to be glued down with some of the most toxic crap I have ever used. I put this stuff down on a Monday and was sick all day Tuesday.
Yuckers. But it won't come up, and it won't leak. After I trimmed the gasket thing, I used
bondo to build up the wonder board to make a gradual seam, then I covered it with a four-inch wide band of fiberglass cloth secured with fiberglass resin. Come to think of it, any or all of those things might have contributed to that two-day headache and sore throat. Oh well.


The drain hole looks sketchy as hell here, but have faith. It cleans up
OK, even if I did sacrifice millions of brain cells to do it.

And to speed the drying process and increase the fumes, I added my little space heater to the mix. Damn resin just did not want to cure...

The tile for the floor was about the worst part of the job. We had mats of tile that I tried to arrange around the seams in the floor so as to work with the slopes I had built in. It took a lot of cutting and snipping with tile nippers, but I think the result looked pretty good if I do say so.


So today I went in to finish tiling. I wanted to let the floor rest at least overnight before I put anything on the walls. Here's how it went together today. I started on the left wall, half at a time:

Then the right wall, half-way up:

And then the back wall, where I staggered the seams because there was not an easy way to cut the tiles that would not show how out-of-plumb the outside corner of the building is, so I fudged it with a pattern that will not make it so obvious:

Here's what it looks like all the way done:


How lucky was that shower cutout?? I did a little happy dance with that one!
In an effort to keep tiles stuck to the overhead portion of the shower entrance, I devised this somewhat dubious system of clamps and braces. The two-by-fours each have scrap tile parts stuck to them to act as spacers to hold the tiles in without squashing the little plastic spacer bits between the tiles. Take a peek. If you're careful, you might see me in the mirror, taking the picture over my own shoulder:


One thing missing: Shower spigot!
As it turns out, this shower is going to have the spigot spray part mounted to a piece of copper tube that comes out of the top of the wall (through the trim and everything). I liked this idea especially because it meant I did not have to cut more tiles.

It is not permanently fixed yet - just there so I know what's what and where it goes. My cheap clamp light is hooked over the end of the pipe, providing both light and heat in such a small area.
I'll have some more pictures when I get the drywall and trim up and the grout in and set, but for now I need to let it rest for at least 24 hours before I try anything else.
No philosophical diatribes today, I fear. Just ceramic tile in a very small shower.
 Oof. After yesterday's mishap involving a hammer (my small one, thankfully) and my finger, today didn't go all that fantastically well either.
 on each screw head to prevent any kind of chemical reaction with the adhesive or rust or other nastiness. Then I went around the bottom and sealed the gap between the top of the metal tub edge and the wonderboard with more fiber putty. That thing's goin' nowhere. Heh. Make me bang my finger, will you? I'll show you. The house could tip over and come apart in a raging flood and the shower enclosure would float
  away on its own. Like Chrsitopher Robin in his inverted umbrella. Only smellier, much smellier.
 , cure, or whatever, but there just isn't space for two people to be doing things at the same time.
 They'll be dry enough to address in the morning. I have this marvelous stuff from Minwax called Wood Hardener. I don't know what it is, but it is a miracle product. You paint some of this stuff on punky old wood, and it hardens it like fiberglass. Put some Bondo on it, sand it once or twice and paint it. Nobody will know the wood was ever rotten. I'm going to put some of that on the wood before I go for lunch and then deal with it when I get back.


